Showing posts with label Desk Project. Show all posts

Wednesday, July 25, 2012

A Behemoth Someday...

Oh yes.  Yes, She Has FINALLY Arrived!

We've had the support structure finished for a little while, now.
And we started on the solid red oak desktop back in...April...?  Wow.  And to think I once truly believed this was a 2 week project.  Anyway, supports by themselves do not make for a beautiful office area, but they DO make for a stressful home.  And guests don't like stressful homes.

So once the assembly of the desktop was complete (which, actually, was back in April)...I lost all drive to actually finish the Behemoth.  Plus, I was paralyzed on the stain issue.  David, my partner and hero, stepped in.

He is the one who sanded the beast's seams, cleaned it all up, and together we used a simple tung oil finish to build the wood's natural color and bring out it's innate lustre.  This was followed by 3 (it might have been 4) coats of oil-based polyurethane, sanding between each coat.
 I love the way it turned out.
Like my yellow kitchen,  it makes me really, really happy, and I keep finding excuses to come back in here to admire it.  I took 30 photos of it, trying to capture its beauty...alas, none of them quite do it justice.
Now who's not a sucker for a good before and after??

First, the before-before:
Ugh-eeww, how could you live like that, right?

And finally...
(And the chorus of Hallelujahs soars to the heavens!)

Thanks for reading!  Mom and Dad, I'm looking forward to showing you guys around! Fly safe!!

Friday, July 6, 2012

Stains are...Good...?


Bare wood.  Bare, beautiful red oak...almost like a blank canvas.  Almost, except that God's paintbrush has already miraculously and gorgeously streaked this canvas with swirling, graceful veining.  That I do not want to ruin.  That I'm sure I'm going to ruin.  Because stains?
 ...are like lipstick.  They just...don't look right.  To me.  Like, other people can put on lipstick, and it looks magical and dramatic.  When I put on lipstick, it looks like I took a crayon to my face.  Unnatural and ridiculous.

Besides, I used to be a professional clothes person.  Stains.  Stains are not generally considered a good thing in clothing.  They're more often considered, well, catastrophic.
My wood stains, the ones I've tried so far, are less catastrophic, and more...

...sad.

So what to do?  What to do.  Can't just leave it bare...right?  And we've worked too hard to just paint it.

We actually have made a choice...stay tuned to see it!

Sunday, April 29, 2012

We're So Close!!

This was me, the other day, having a tea and redesigning the desktop.  It felt so good to move all the pieces into place and get rid of the ever-present drop cloth.  I needed a desk to work on my redesign of the desk, so I set up two pieces of plywood.

Dave fixed the drawer on the Crazy Case by shaving off 1/8" of wood from underneath the drawer glide.  She really is a crazy-looking thing, but the drawer does glide!

We completely finished Slats:
 The shelves glide like good sliding shelves, the printer and CD player fit perfectly, and the drawer face is actually painted, though it wasn't in this photo.  And the drawer also glides like a good sliding drawer.  (I am totally over my loathing of this piece, and now I feel even kind of affectionate for poor, dumpy little Slats.  She may be ugly, but I think she means well.)

Our options for construction of the top included:
It was Dave's idea that won the day.  We went with "8 Oak Boards" but with a little modification...
And now there is no weak point at the center since each and every joint (except the one in the back) is supported by Slats.  The weak point lies in my ability to lay things out square.  More on that later.
Remember how Slats wobbles?  Well guess what!  The floor isn't level (it slopes up into the corner, surprise!), so there actually isn't a wobble now!  Almost like we did it on purpose!

So back to the desktop.  We went with red oak boards from, um, one of the two big-box stores (I honestly have no idea which one).  One of the 8" ones was roughed up along one edge, so they gave us 25% off, and I attached it damaged-side-down.  Score!

The check-out lady had to call to get the discount verified...she claimed I was buying "a damaged redwood board."  Close enough.
Now, I bought two big clamps for this portion of the build, knowing the ones I had at home wouldn't be big enough to clamp all 4 boards of the desktop.  I did not realize that even the new clamps wouldn't be big enough to clamp our interesting corner construction:
 So I glued/clamped 4 of the 7 boards, laid it out to trace, cut it...
 ...and then glued/clamped the rest.

As I told Dave, this portion of the project was probably just beyond my current skill set.  As it turns out, when I laid the first set of boards to trace, I didn't have the two legs of the desktop perfectly square...so the left side of the center piece is juuust a little gappy.  And there really is no way to fix it, since we intended to stain the desktop, not paint.  Any jimmy-rigged fix would be visible and ugly.
Besides, it's not that bad, is it?

So obviously the next step is going to be to level the support units (Slats, Crazy Case, and the Other One).  Since, you know, the floor's not level.  There's already a 3/4" piece of scrap lifting Slats's toes, but she's still tilted forward and, surprisingly, to the left.  Then, when I get home this coming week, we're gonna stain and finish the desktop! !! YAY!  We're SO excited to finally (almost) have a realio trulio desk!

**But then we've gotta build hutches and extra support to hold the extra weight.  We may retire on this, our first job.  Still, though, so good to be nearly finished!

Saturday, March 31, 2012

And the Slats Goes On...

...and on and on.

We interrupt this vacation with an update on the phenomenon known as 'the Behemoth.' 
The third unit in this desk's support structure, and easily the ugliest (though Dave swears he has a soft spot for the poor old girl), got very little attention in the very little time we were home during my last off-hitch.
Well, at least she got very little productive attention.  Story to follow:

Slats is constructed of reclaimed wood.  The reclaimed wood had a dark stained finish on it.  The finish was, apparently, sealed with something or other.

We thought that priming would be good enough over that seal.  It was not.  The primer was peeling off like cheap dried Elmer's glue.
 SOOO...
After having applied 2 coats of primer, I determined that, however painful the lesson may be, the time had come to start over in the paint department.

Dave and I stripped her bare.
It made me pretty mad.  It took a long time.  And I had only just barely finished the stripping when we left for our Ohio Tour.  Dave can attest, I was a grouch for the first couple hours on the road.

By the time we got back, however, I had fully, fully made peace with the "It Doesn't Have to be Perfect to be Beautiful" concept.
 She isn't smooth.
 She's barely primed.
 She makes shameless use of caulk in the gappy places.

And...
 Wobble.  Wobble???


Yep.  Wobble.

And this is a no-brainer, but, remember how we did the assembly on this girl at, like 1am?  (Oh, did I not mention that in the post?), y'all, don't assemble big projects at 1am.  It is not a good idea.  THAT IS WHY I USED A PIECE MEANT FOR THE DRAWER IN THE FRAMING STRUCTURE. Thus, it is 1/2" shorter than its opposite, and the framing, which is supposed to keep things square, has skewed the whole piece.

Oh look, a ladybug.
 But did we fix the non-smoothness?  Did we prime the heck out of her after the stripping debacle??

Did we fix the wobble???


NO, we did NOT!
 She is primed, lightly sanded, and final coat-ed, lying on her side in the office.

And there stay-eth she.

My family, you are in our prayers daily.  My friends, we pray for you as well.  But we also fervently pray for the day we can say we have finally added a desktop and called this monster D-U-N.

Saturday, March 24, 2012

Quickie On the Desk

Laura, at Piece of Cake, is my soul sister.  She probably has no idea that this is true.  Laura, I wrote that title for you.  Glad you're feeling better!

Remember Behemoth Drawer #2?

Well, this is a revisitation.  Spell check does not like that word.  Spell check does not know everything.

This (and the spice jars) are the only things I got done before we left on the fabulous vacation in the following posts.  I wanted to scratch the Crazy Case off my list of to-do's before we left, so I attached the drawer glides.  Quick little job, right?


Nope.

It wasn't gliding like a drawer is supposed to glide, but rather reluctantly udging in and out in a very depressing kind of way. There was too much friction in the glides.

So I tried screwing the sides of the glides in, so that they'd hug the drawer closer and not create so much friction.  There are holes manufactured into the glides, I thought, for just this purpose.  The screws they provide, however, would hit the running wheel no matter what I did, and create more friction plus a little sound effect.  *Click, click*

So I ripped them back off and removed the drawer bottom, ruining, in the process, my wood-filled, primed, sanded drawer face.  For the moment, anyway.

 I still thought, at this point, ok, so maybe this isn't a 10 minute job, but I'll bet it still probably won't take more than an hour.
*And the fates chuckle maliciously*

Dave cut 1/8" off the width of the drawer bottom for me.  Thank you, Dave.

After I reassembled it, the back half of the drawer glides beautifully.  But once we reach this point (pictured above), we go back to udging.

And it was no longer the drawer bottom's fault for being too fat, either.
It was my fault for attaching the sides to the face too...fat.

So I removed all  the screws from the face and tried to squeeze the sides in closer with a clamp and rescrew.  Don't laugh, you woulda tried it too, don't lie.  'Cause I could feel my "10 minute job" slowly but surely growing into an all-day-battle.

So......did you know, wood glue is really strong?  Like...really strong.  It may have a cute picture of a cow on the label and everything, but this is not the same stuff we used when I was 5.  The sides wouldn't budge.  But I'm pretty sure that cracking noise I was hearing had something to do with component failure.  I decided to quit while I was ahead.  This 10 minute job had already taken 2 hours.

Dave said he'd remove the drawer glides (again) and cut the sides in for me.  I decided to trust him.

Ok.  So that will probably be that.  It is going to look funky, but by golly that sucker is going to GLIDE!!!


But you know what else looks funky?
Crazy Case now has a Wavy Drawer.

I did this on purpose, actually.

See, what had happened was...

I laid a piece of flat wood on top of the drawer construction to make sure the drawer would move in and out without getting hung up on the desktop (we will attach a desktop someday, we will!!), and........the right side got hung up.  But the left side didn't.  And the drawer is mounted flat in there, so there's no way I hung the drawer with the right side high.

So I jigsawed a little wave into the top of the drawer.  I figured it's gonna look funky anyways, and now we're up to 3 hours, and PRESTO!!!!
It's gonna look funky, but that sucker's gonna GLIDE!!!


*****


I totally forgot to take final photos of Crazy.  She is all done, though...minus a drawer pull.  I got the shelf pins for the second shelf, and she is already all loaded up with stuff, standing in her place by the wall, waiting for Slats to be finished and a desktop to hold (we will attach a desktop someday, we will!!).

Hope you've enjoyed your daily dose of someone else's "I spent all day on that??!!?!"


Ta-ta!

Friday, March 2, 2012

Corner Shelf Thing

This is the post about the corner-shelf-thing. 
We shall call her Slats. 
You'll see why later.

We're making Slats out of this pile of wood that was once an entertainment center of some kind that someone gave to us.
One really nice thing about this particular pile of reclaimed wood is that it comes with some pretty nice free hardware.  Check it out.
One UN-nice thing about this particular pile of reclaimed wood is that it's all stained really dark and shellacked or something (the above photo is, at least on my screen, exactly the same color as the wood).  So it has to be sanded-the-crap-out-of.
 *I suspect this is true for all reclaimed wood, but what do I know
I sanded the finish off the ends of all cut pieces with 60 grit on an electric sander so that the wood glue would bond well and make a good joint.  Pretty easy, actually, but do wear a dust mask, for Heaven's sake!  The above pieces will make up the "legs" of Slats.

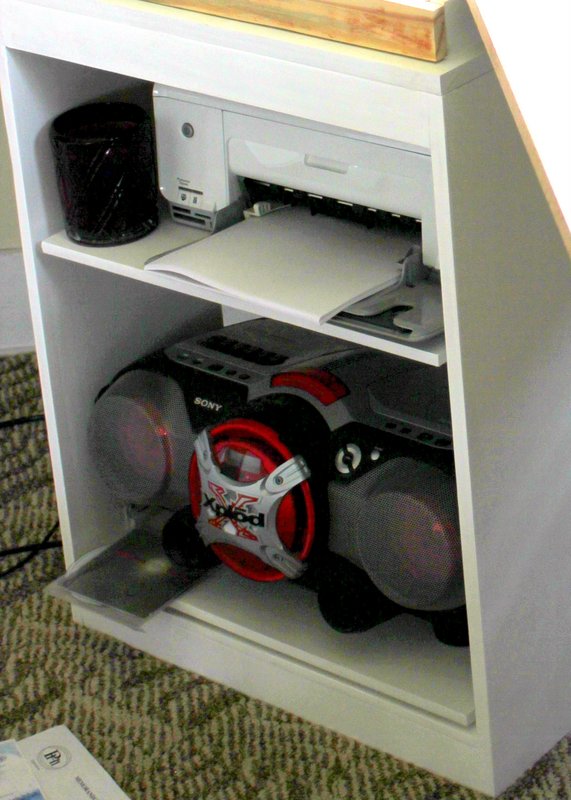
Perhaps I should show you what Slats looks like?  Would that help?
There she is...Printer Home.  Those shelves are meant to slide in and out.  Now you see why we're calling her Slats?  I wanted the framing to be open for two reasons:
1 - She sits awful close to a floor vent I didn't want to block
and
2 - She's really big, and I thought she'd be too heavy.  Like the file cabinet/bookcase thing (why don't we have a proper name for that one yet?).


These rectangles make the upper and lower framing for Slats.  
Dave did most of the sanding on these, mostly because I forgot they needed doing.  They were glued up on Clamp-Its and reinforced with counter-sunk screws, 2 in each joint.

This is me, spacing, gluing, and clamping the side slats/legs onto Slats's upper frame.  
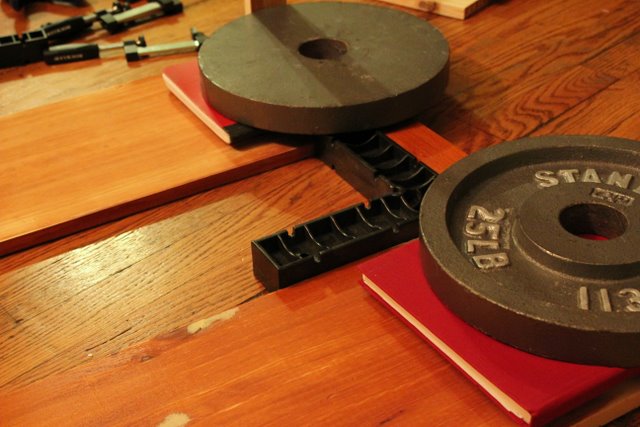
 Each glue joint then got 4 countersunk screws for reinforcement. (The books are there to help the weights/clamps balance.  The Clamp-It is kinda acting as a square, but mostly it's there to provide evenness of spacing.)
I attached both the top and bottom framing to the 2 slats on the floor this way.  Then I flipped her over to glue, clamp, and screw the other side.
Then I flipped her on her face and did up the slats/legs on the back (no pics, I forgot). The lower frame doesn't sit flush to the floor...the legs do, obviously, but the framing is designed to sit 1/2" short to allow the floor vent that Slats sits near room to breathe.  You can see the legs overhanging the frame in the photo.  It's not the prettiest solution, but I think it will work.

Then we laid the bottom.  It did eventually get screwed down, but not immediately.  First, I wanted to install one of the sliding shelves and see how it did.

I saw this done once with scrap wood to place your drawer glides exactly.

I, however, am not quite so picky.  The shelf needed to rest about 7" above the bottom, so I hunted around until I found something in the house of about the right height.
Ah, King's Quest...relevant in all walks of life!
I'm not sure why I even have that King's Quest box...it's full of disks.  You know, disks?
If any of my siblings wants it back, you can have it.  I don't have the right drive for it on my computer anymore, anyway.  But you gotta wait till Slats is done before I can spare it.

Anyways.  The above method worked perfectly.  So I took it apart.

And painted Madame Slats with 1 coat of primer.  That's one of the shelves there on the right, leaning against the wall.
(See how the frame sits off the floor and leaves a gap?  That's what I was trying to explain.  Shoulda waited for the picture, I guess.)
This was two days before I left for work.  And that is all I had time for.  The next day, as I was packing, I took this one.
That's our primer back there...Bulls Eye 1-2-3.  Good stuff.  It covered over that dark stain pretty well in a single coat, though I think it'll probably need three.  It was at the very point that the phrase occurred to me "it'll probably need three" that I asked Dave,

"Do you think we should just push them all against the wall, set some wood on top, and call it done?  Forget the paint, heck, forget the screws, just call it done??"

He hugged me.

And he said it was ok to leave it all right where it was when I left for work in the morning to be gone for 14 days.  It's sitting in the walk-way, not even maneuverable.  Dave is not a big one for mess...he'd rather just get rid of all our stuff than have a mess.  But he told me it would be ok.  It gives me a lump in my throat.  He's ok with my mess.  And I know it's "our" mess, and our project, but still...I sure miss him.

And guys, Slats IS a big girl...2'x3 1/2' and 30" tall or something like that.  Good thing she's not solid, or she'd be too heavy to move once assembled.  I mean, I knew the measurements (I DID design her), but 3 1/2' on a computer screen is just NOT the same as 3 1/2' blocking the walk-way.

I hope you're all having a good week! I am halfway through my hitch and going to be pretty happy to go home.
OH! And I forgot to tell you, I found something AWEsome the other day back behind the base lodging over by the dumpster.  It's really really cool!  I'll show it to you...someday...when I figure out what I'm going to do with it.

Cheers!

Saturday, February 25, 2012

Behemoth Drawer #2

Being the Fourth Part in the Continuation of the Ongoing Build of 
The Behemoth
a Desk of Monstrous Proportions that will Take Up the Whole Room

We take your now to the Weird IKEA Bookcase...


This is a weird little bookcase I got at IKEA when I moved into my first apartment.  I kept it bare wood for years...Dave painted it white to match the file cabinet/bookcase thing.

It's part of that "design your own desk" thing they do where you buy the legs and top piecemeal.  Which is exactly what I did, only I used a file cabinet from my parents for the other leg, two shelves side-by-side for the desktop (that now reside on the wall in the laundry room, like respectable shelves), and a piece of scrap wood to level it out (it's MDF, yeuch).

So...now we're using it (the bookcase thing) as a leg for another desk (lovingly referred to as The Behemoth).  It's the unit on the far left, if you couldn't tell.
(This is an updated picture of the B.  I'm playing with the idea of boards for the desktop instead of ply...maybe)

But the poor bookcase is too short for the job, so we had to add a 2" box to the top.  This houses Behemoth Drawer #2, seen in the drawing.  We also added another book shelf (out of one of my earlier cutting mistakes). 

These pieces are the box for the drawer.  I painted the insides of the boards first, then (since the drawer would be too narrow to get in there with a screw driver) I attached the drawer glides and assembled the box.

With the drawer glides in the way, my Clamp-It wouldn't fit into the inside corner.  Happily, I discovered that this is an easier method that I really prefer, so now that's how I do. I know it's 'the wrong way', but it works for me and makes me happy.

So, you know how I pre-painted the insides of the boards...? I forgot about the part where wood glue doesn't bond to paint.  So I had to sand this edge.
...and now there's a gap where I inadvertently rounded down the corner.  Well, nothing's perfect.  (And that's the real reason they invented caulk!)

The box attaches to the top of the bookcase from the underside using countersunk screws and prayer that I hit the middle of the piece and don't split the wood.  God was gracious in my failure to measure...no wood was split.

Dave cut all of these pieces himself, including the channels on the drawer sides.  This is the fitting before assembly of the drawer:
(These are the slides we're using, btw...they were about $7 a set cause we got the real long ones)

From there, I attached the sides and bottom to the face.  I used countersunk screws straight through the face into the drawer sides.

...and went straight into the mortises.  Just like drawer #1.  Only this time, I didn't fix it.

See the screw through that gap?  Oh, trust me...it's in there.  But now the drawer bottom doesn't jiggle anymore, so I guess that's good.

And this is where that piece sits as of right now. 

The top is primed, the drawer is assembled without the glides, and the face has been wood-filled and sanded.  This unit can't be considered "done", though, because of the glides...I can live with a not-totally-painted bookcase, but the drawer doesn't slide right with only half the glides.  Silly.  The little screws would've taken 10 seconds to install...I just ran out of time before I went back to work.  I opted to clean the kitchen instead.

Luckily, I have a teammate.  He takes up my slack!  He's got my back!  He listens to rap!

Those are all 100% true!

Happy Saturday!
Template developed by Confluent Forms LLC