Showing posts with label Sewing Projects. Show all posts

Wednesday, October 17, 2012

Black Wool Sweater Hat

This is not my first hat attempt.  My first attempt I will not even attempt to explain.  Compared to my first attempt, this hat is highly technical and planned out.
Ok, here's the sweater before.  You may not be able to tell, but this thing is absolutely tiny.  Back when I was still trying to wear it, the sleeves were juuuust too short, and my belly kept juuust peeking out whenever I raised my hands above waist level.  Or whenever I bent over in the slightest.  So...not fit to wear.

So I threw it in the wash on hot, then threw it in the hot dryer, and now it might fit a very chubby 5 year old...except what mother wants her 5 year old wearing something so low-cut?  Ahem, anyways, this process is called "felting for everyman."

I measured the circumference of my head and got 22". I divided this up into five sections and got four pieces of 4" and one of 6":
And then I made a mistake. You might even call it a 'fatal' mistake.

I decided that the sides of each of these pieces only needed to be as long as half the diameter of my head (nape of neck to forehead).
Let me tell you right now, don't do it this way.  But nobody told me that, and I wasn't thinking like a draper, so this is the way I did it.

I made a pattern based on these measurements (according to my screwy logic):
Notice that my pattern bulges out a bit on the sides.  This was good thinking...but...well, I'll explain in a minute.

 Then I cut four pieces just alike and one piece that was 6" at the bottom but still 8" either side.
Now my sweater looks like this:
 Ok, so here's my second mistake: there is absolutely no reason for me to have cut the pieces completely apart.  What I should have done is cut them like a chain, leaving the bottom band intact...because as it was, I had to sew them one to the other all the way through the bottom band (which is bulky and awkward and ugly):
 Anyways, I'm doing this at work, so that's why I'm doing this by hand.  If I had my serger with me, I would be doing much prettier work, I assure you.  Yeah.  That's why this thing turned out like this...
 ...because I don't have my serger.

Okay, but we're not done yet.  Because here how this fits at this point:
 Yes, that's right, you don't get a photo, you get a sketch.  See how it looks pointy?  That's because I did straight sides.  Straight sides on a lumpy head.  How much sense does that make????  Don't do that!  Those pieces should have been bulged at the base, then come to a wide point at the top...straight sides = dunce cap.

Also, that 8"?  That should have been the distance between the center of each piece to the point at the top, not the sides of the pieces themselves.

This is basic trigonometry...the upshot is, I made the legs of each triangle way too short.  So as well as being pointy, the hat at this stage is much too small.  How to fix this?  Re-cut the pieces.  But with no sweater left to use, I can't re-cut.  This is why I hate cutting fabric.

Alright, then, let's focus on something that can be fixed.  See how much of my forehead is uncovered?  About 3" worth.  We're going to cover this with a brim.  So I measure from behind one ear to behind the other:
 ...and then from the top of my eyes to the edge of the hat (again, 3"):
Now we're cutting this piece on the double (which means two pieces cut at once), so I took it from a sleeve (no pattern, just wing it, I find it works, sometimes).  I also left the straight edge intact to provide a clean edge:
 Then I stitched one layer just above the bottom band on the hat:
...then flipped that seam under and stitched (very loosely, because I was tired of it) the other layer inside the hat, covering the first seam.  End result?
 Presto!
The Warm Dunce Cap
What can I say?  I didn't have my serger.  And I had my hair in a bun, under the hat.  Under the point of the hat, actually.
But it looks only marginally better worn over hair that is down.  I was thinking maybe I'd put a flower on it, make it look a little less scary/wonky.  Now that it's a scary/wonky hat, I don't feel like I can donate it to charity...but it's a shame to waste such beautiful wool.  The real problem with this hat is the pointy top, and there's not really much I can do about that.  Without my serger.

Sigh.

I tried (twice).  At least I tried (twice).

Saturday, October 6, 2012

Crib Mattress Sheets

So now, as promised, I'm gonna tell you all about the crib mattress sheets I did for the coming Baby Elliot.
 One of the simplest sewing projects I've done, I think, but somehow this tutorial ended up being really verbose with a sad shortage of photos.  Sorry about that, y'all.

I started by figuring out the dimensions:

  • The mattress is a custom size: 53x20x3 (standard is 52x28x?)
  • I planned for each side to go all the way from the bottom of the mattress (3"), up and over the width 20" (or length 53"), and back down (3") - total of 59"x26" plus an extra 3" per side (3x3) to extend underneath the mattress edge..........so the final dimensions are 65"x32"
  • This means I need 2 yards of 45"-wide baby-safe fabric for each sheet.  In a cute pattern, obviously.
Now give your math a break for a second...take your fabric, serge the raw edges (or zig-zag them), and throw it in the wash.
Had a refreshing break?  Good.  Get your pencil back out.

Now, in addition, I gotta get some elastic to make these fitted sheets "fitted."  There are two ways to do this: 1-I can do one continuous piece of elastic threaded all the way around the bottom of the mattress, or 2-use one piece of elastic at each end of the sheet spanning the corners and ending before the straight along the length.  I've done both, and I like the first method best because it requires less figuring and also because I think it makes the sheet less work to get to look nice on the mattress.  The length of elastic I need should be 2/3 the perimeter of the sheet, soooo....
  • Go back to the original dimensions of the mattress (53x20) and subtract 3" per side (6"x6" total) for the amount that the fabric will wrap under and draw together.  With these new dimensions (47x14), add back 1" per side for hem allowance.  So now we have 49"x16".
  • Remember how to get the perimeter of a rectangle?  Yep, that's it, multiply length by 2, width by 2, then add them together: (49x2) + (16x2) = 130"
  • But if you used a piece of elastic exactly the same length as the perimeter of your fabric, your elastic won't do much elasticating, right?  So the rule I use is that 2/3 rule...and 2/3 of 130" is 86.6666, which, as you know, equals 2.4 yards.  I'm gonna round that down to 2 and 1/3 yards.  I used 1/4" elastic for these sheets.

Good.  Now we're ready to sew.  Almost.

Your first step is to square up the fabric (no photos, just visualize!).  This is necessary because, no matter how carefully your nice Jo-Ann's lady cut, I can all but guarantee that your piece of fabric is most certainly not square and will lead to much furrowing of brows and gnashing of teeth if not trued now.  **The following method is possible only because we're working with woven fabric (if you're using a knit, sorry, but this method won't work).

Take one raw end of fabric.  Snip into the selvedge (the finished edge) about 1" from the raw edge and about 1" into the fabric, making your cut roughly parallel with the raw edge.  Now rip that sucker along the raw edge.  Rip it all the way off.  You may notice that the piece you just ripped may have started out about 1" wide, but by the end of the strip, it's quite a bit narrower or wider than you expected.  Aren't you glad you trued this edge?  From here, you now have 2 square corners from which to measure.  Me, I would measure the length first...So measure down from your squared corner to the generous side of 65", snip a 1" cut, and rip.  Now you have 4 square corners, but two very curly edges.  These need to be reblocked with a hot iron and steam.  All that means is that you have to press the curly back to flat with a careful hand that teaches the fabric to lay the way it's supposed to, instead of leaning in the direction of the rip.  Once you have flat edges again, you can measure and rip the width (32"), and then block that edge as well.  Now we're ready to sew.  Almost.

I did these sheets with a french seam at the corners (an idea I took from here - which is probably a better tutorial all around, though much less entertaining).   You start by marking out and cutting a square in the corners of your fabric.
Can you see the pencil line?  No?  Nuts.
I folded my piece into quarters so that all four corners lay on top of each other.  Then I marked a 5.5" square into that corner and cut all layers with a rotary cutter.  Now take each cutted-out corner, fold them wrong-side-to-wrong-side, and get ready to stitch a scant 1/4" seam from the outer edge to the inside corner of the fabric.
 I'm using just the width of the presser foot to get my seam here.

Now take that seam you just sewed, press it open (or finger press it), and fold it the other way, right-side-to-right-side, and stitch another seam alongside the first.  In order to fully encase the original seam, this one should be a fat 1/4" wide, closer to the first guide line on your machine.  Your inside seam now looks like this:
That's a french seam!  Ultra simple, ultra durable, very polished both inside and out.

Now you've gotta set up the elastic casing around the bottom of the mattress.  You might be tempted, since you bought 1/4" elastic, to sew a 1/4" casing...do not cave to this temptation!  Ahem, that's what I did on this yellow sheet.

The casing is formed by first pressing the whole hem up 1", then going back around and pressing that 1" down into itself by half, leaving you with a little over 1/2"-wide casing (conversely, you could press up a skinny 1/2", then turn it up again a fat 1/2" - either way, it's a fold-fold-press).  Since you're working here with a cotton weave, the fabric is naturally kinda stiff.  And since you're about to sew a really long line of uncomplicatedness, I personally prefer to simply do a good pressing job and forget the pins.  Or at least, pin only every foot or so.  But I'm not going to tell you how to do your sewing...that's up to you.
I will tell you to be careful with that iron!  And if you burn yourself...
 ...get the aloe on it!  Yes, it is that bad, go get the aloe!

Ahem.  Now stitch that casing.  Leave yourself a 1" opening near one of the corners.
 As you stitch the casing, lay each of your french seamed corners in the same direction...it will make threading the elastic through much easier.

And now you're ready to thread in the elastic.  Fasten one end to a safety pin, and secure the other end somewhere near your casing opening so it doesn't accidentally get sucked into the casing and lost.  Not that I've ever done that.

Do I need to explain threading the elastic through the casing?  I hope not.  I didn't take enough photos, obviously.  As you inch your way through the casing with the safety pin, just make sure the elastic is going in flat with no twists midway.  I found it easiest to start the elastic right next to one corner of the piece and work away from that corner, preferably down one of the long sides.  This is the tedious bit, this elastic thing, but the results are so rewarding.
Once you've finished the threading, lay one raw end of elastic flat over the other raw end inline with the circuit you've just made, and zig-zag them together going back and forth a few times to secure it.

That's it!  Jump up and down and clap!  Now depending on how crazy you went at the fabric store, repeat all steps 13 times for your stack of cute baby print fabrics.

Saturday, March 31, 2012

D-I-Why would you make that?

The Red Neck Purse
I'm on hitch right now.  That means 14 days of hanging out in the Gulf.  I don't have a regular job that I fly (I mean, my company has regular contracts, I'm just not assigned to one of them)...I'm "spare", which means I get one-off jobs as they come along.  Or I don't do anything.

But the other day, as I was hauling my stuff into my temporary place of residence, I was looking at this:
 This is my workout collection.  It came with that plastic carry case, but the case has never really done a good job of keeping the weights in place...whenever I open it up, everything has dumped all over on the inside and comes gushing out on the floor.  Plus, 30lb is a little much to carry in one hand, and so I was thinking of splitting the weights into different cases.

Now, I've been wandering around blogland lately, and I really like the whole shabby-chic thing other bloggers and designers have going on.  It's a little girly, a little industrial, (a little contrived), and very not-perfect.  I thought I'd head over to Salvation Army and see what I could find to make myself a portable weight rack that kinda fit this description.  (If nothing else, it'd be something to do during the day).
Now, I have no idea what that wood thing is, and for that reason (mostly) I am not going to give a tutorial of what I did.  Okay, besides, how many of you are in really desperate need of a portable, shabby-chic weight rack?  That's what I thought.

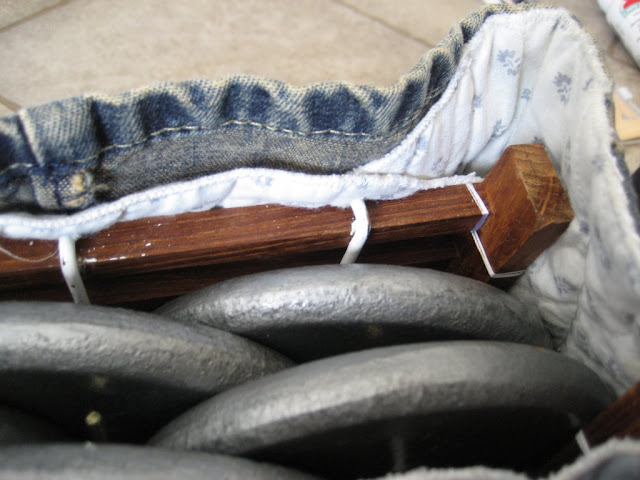
So I cut the wood thing with a flush cut saw and attached the two halves to one of the placemats by stitching just the top corners:
Now when I hooked the shower curtain hangars on the edges, I got a structured basket-type-thing.
Then I opened up a leg of the jeans to get as much flat fabric as possible...
 ...and stitched up a bag around the wood.  The leather belt (which is the only one I could find) was just barely long enough to go under the bottom and provide a good handle by which to carry all.  I painted the roses white because I thought the gold was just too tacky (ahem).

I meant this to be a "bag," not a "purse," but as you can see...
...
Um, 90's, ghetto, I-only-wish-I-were-so-fabulous, Red Neck Purse is ready for her close-up.

It does do what I wanted it to do...
 The bulk of the weights are contained, they don't dump out even if the purse ack bag falls over, and they're still easy to remove and replace.  You know, in case I ever work out.
 But if the strap were just a little longer, I'm pretty sure it'd be screaming Red Neck Diaper Bag Chic from my shabby-chic-wannabe shoulder.
Sigh.

Monday, February 27, 2012

A Whole New Thing

My father-in-law came to visit us this last time I was home.

Joe is easy to talk to, and it was nice to hang out just the three of us for a couple of days.  But I must tell you...

...he brought me a present.


Can you believe this AWESOME GUY??!!

...truly...
...a thing of great beauty...

...is a joy...

...for the Rest of My Friggin LIFE!!!!

 Mom?  Isn't this the same one you had/have??  These babies last for generations!!  And it comes with a table!  It sits flush!!!  ...as you can plainly see.

It's so easy to flip it up and flip it back down, out of sight.  With an extender arm for longer projects!  I am so flipped out about this sewing machine!!!!

He even brought me a box of notions!  MAN!!


And Joe has a hard time getting around, but he got that huge, awkward thing all the way out to me on his own!  I don't think I could have thanked him enough!  Joe, if you ever see this, THANK YOU AGAIN!!!!!  And Jo-Ann, THANK YOU for letting me have it!!  And I will totally teach you to sew!  But you'll have to come visit for the lessons, or we may be air-stitching (like air-guitaring, but less awesome).

You know this starts a Whole New Thing?  It does.  I'm gonna have to start a whole stitching section.  I'm gonna show y'all how to make stuff, alter stuff, and hang tuff theater-style!  Like a ninja!

So while I salivated over my AMAZING AWESOME PRESENT, Dave and Joe talked.


It was a beautiful couple of days, and seriously not just because of the present...it really was great to have my FIL up to visit.  We celebrated with the first bottle of Devil's Drink we've purchased as a couple.

Hendrick's...my favorite

And it was delicious.  And the rest will probably sit on the shelf for a good six months.  Or until we have more visitors.

VISITORS???? Come on, you know you've always dreamed of traveling! And exotic Cleveland may be cold, but the house is warm!  We even almost have a guest room!

Engraved invitations to follow.

Seriously.
Template developed by Confluent Forms LLC